Introduction to Wagtail | Coders of Colour
Developing and Building our Site
Check out the video based on this section here.
Edit the homepage model
Out of the box, the “home” app defines a blank HomePage model in models.py, along with a migration that creates a homepage and configures Wagtail to use it.
Edit home/models.py as follows, to add a body field to the model:
1from wagtail.core.models import Page2from wagtail.core.fields import RichTextField3from wagtail.admin.edit_handlers import FieldPanel4
5
6class HomePage(Page):7 body = RichTextField(blank=True)Generate and run the migrations needed
The changes we just made will need to be applied to the database. Here we are adding a body field, so the database needs to be able to store the information we add to the body. We do this using the manage.py file with the two following commands:
python manage.py makemigrationspython manage.py migrateThe above commands should do the following:
- make a new migration file at mysite/home/migrations/003_homepage_body.py
- Run the new migration file to populate or change the schema for the database
(mysite-venv) kevin@mulder:~/shared/mysite/mysitepython manage.py makemigrationsMigrations for 'home': home/migrations/0003_homepage_body.py...What is the manage.py file and migrate?
The manage.py is a python file we use to execute administration tasks. When we run python manage.py migrate we are executing the django migrate method. This will create automatically create python files that define or adjust database schema. It saves us manually creating tables when we need them.
Migrations are Django’s way of propagating changes you make to your models (adding a field, deleting a model, etc.) into your database schema. They’re designed to be mostly automatic, but you’ll need to know when to make migrations, when to run them, and the common problems you might run into. Read more about migration on the Django docs
At the moment we have a 'body' field on the homepage, but if you create a page in the admin interface you will not see any way to edit it. In order to make the body field editable we can add a FieldPanel to the list of fields that should be shown when editing the page.
1class HomePage(Page):2 body = RichTextField(blank=True)3 content_panels = Page.content_panels + [4 FieldPanel('body', classname="full"),5 ]Check your terminal to see if the site is still running, if it isn't, run
python manage.py runserverIt's a good idea to have two terminal windows open whilst developing
Go to the local site in your browser at http://localhost:8000/admin.
From the admin menu select pages > home.
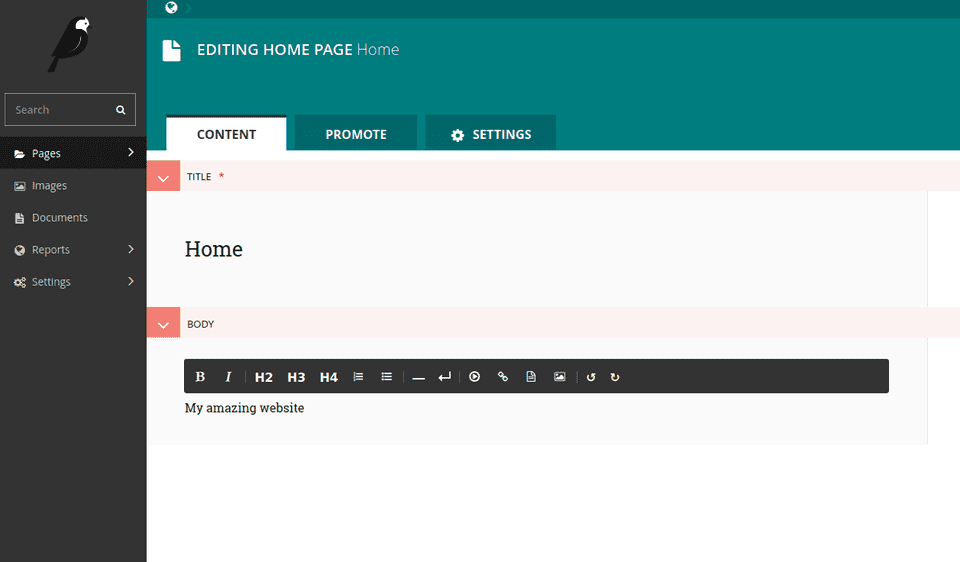
This will land you http://localhost:8000/admin/pages/3/ which is your homepage. If there where child pages they would be listed here. Under the home title click 'edit' to edit the page. (note you can also do this straight from the admin menu by clicking page > then the small pencil icon.)
You should be on http://localhost:8000/admin/pages/3/edit/
Add some body text and in the bottom bar click on the arrow next to "Save Draft" and click "Publish".
Update the template
Your homepage has now been stored in the database. At present 0.0.0.0:8000 still shows the dafault welcome page, rather than our new homepage, however. In order to display our content, we need a template to show django how it should be presented.
Take a moment read through the django documentation on templates for an overview of how this works.
Edit home/templates/home/home_page.html. Remove all of the current content (the welcome page) and replace it with the following:
{% extends "base.html" %}{% load wagtailcore_tags %}{% block content %} <h1>{{ self.title }}</h1> {{ page.body|richtext }}{% endblock %}Your homepage title and field should now show on the root page of your local site at http://localhost:8000/.
Create a blog app
Check out the video based on this section here.
An app refers to a submodule in our project. It's self-sufficient and not intertwined with the other apps in the project such that, in theory, you could pick it up and move it down into another project without any modification. An app typically has its own models.py. You might think of it as a standalone python module. A simple project might only have one app, whereas more complex projects or websites will have multiple apps that define different models. E.G a news app defining a NewsPost model, a video app defining a VideoPage model etc.
If you find one app is solving two problems, split them into two apps. If you find two apps are so intertwined you could never reuse one without the other, combine them into a single app.
Because a blog has its own structure, with things like 'posts' and 'comments', it makes sense to separate those sorts of things into a blog specific app. This is done via the manage.py file. It should be created at the site root:
python manage.py startapp blogso your file structure should now be:
.├── blog # The blog app we just created├── db.sqlite3├── Dockerfile├── env├── home├── manage.py├── mysite├── requirements.txt└── searchTo view your file structure like above, type dir if you are using Windows, and ls on Mac and Linux.
The startapp command generated an app with some boilerplate files for us (use dir blog or ls blog to view the files):
blog├── admin.py├── apps.py├── __init__.py├── migrations│ └── __init__.py├── models.py├── tests.py└── views.pyNow we need to enable the blog by adding it to our site settings. add blog to INSTALLED_APPS in mysite/settings/base.py
1# Application definition2INSTALLED_APPS = [3 'home',4 'search',5 'blog',6...Define the model for the blog index page
Edit blog/models.py:
1from wagtail.core.models import Page2from wagtail.core.fields import RichTextField3from wagtail.admin.edit_handlers import FieldPanel4
5
6class BlogIndexPage(Page):7 intro = RichTextField(blank=True)8 content_panels = Page.content_panels + [9 FieldPanel('intro', classname="full")10 ]Similar to what we did earlier, run python manage.py makemigrations and python manage.py migrate. This will add define the schema in our database for the blog.
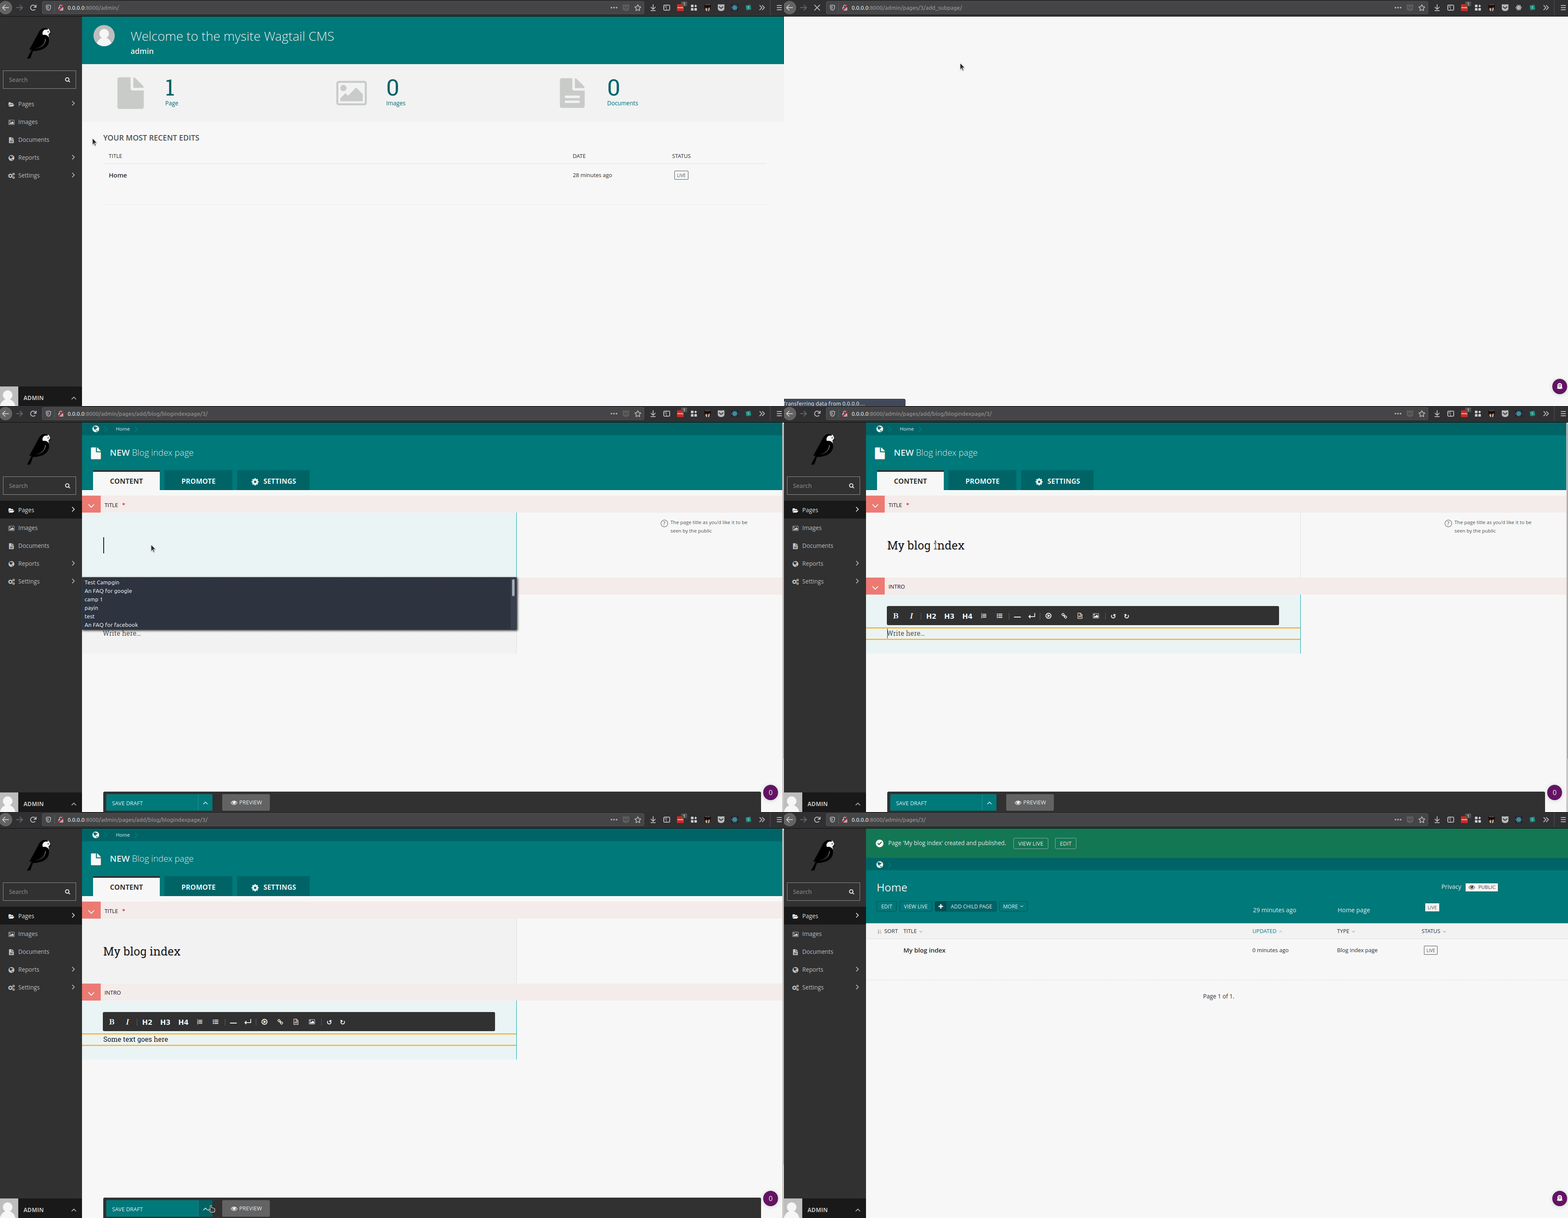
After running this, go the the cms admin and add a child page to our homepage:
Create a template for the blog index
Make a file at blog/templates/blog/blog_index_page.html with this content:
1{% extends "base.html" %}2{% load wagtailcore_tags %}3{% block content %}4 <h1>{{ page.title }}</h1>5 <div class="intro">{{ page.intro|richtext }}</div>6 {% for post in page.get_children %}7 <h2>8 <a href="{% pageurl post %}">9 {{ post.title }}10 </a>11 </h2>12 {{ post.specific.date }}13 {% endfor %}14{% endblock %}(Restart the local server if your template isn’t found by ctrl + c then python manage.py runserver)
Add a model for blog posts
1from django.db import models2from wagtail.core.models import Page3from wagtail.core.fields import RichTextField4from wagtail.admin.edit_handlers import FieldPanel5
6
7class BlogIndexPage(Page):8 intro = RichTextField(blank=True)9
10 content_panels = Page.content_panels + [11 FieldPanel('intro', classname="full")12 ]13
14
15class BlogPage(Page):16 date = models.DateField("Post date")17 intro = models.CharField(max_length=250)18 body = RichTextField(blank=True)19
20 content_panels = Page.content_panels + [21 FieldPanel('date'),22 FieldPanel('intro'),23 FieldPanel('body', classname="full"),24 ]Same again, run python manage.py makemigrations and python manage.py migrate to create the database changes
Create a template for blog posts
Make a file at blog/templates/blog/blog_page.html with this content:
1{% extends "base.html" %}2{% load wagtailcore_tags %}3
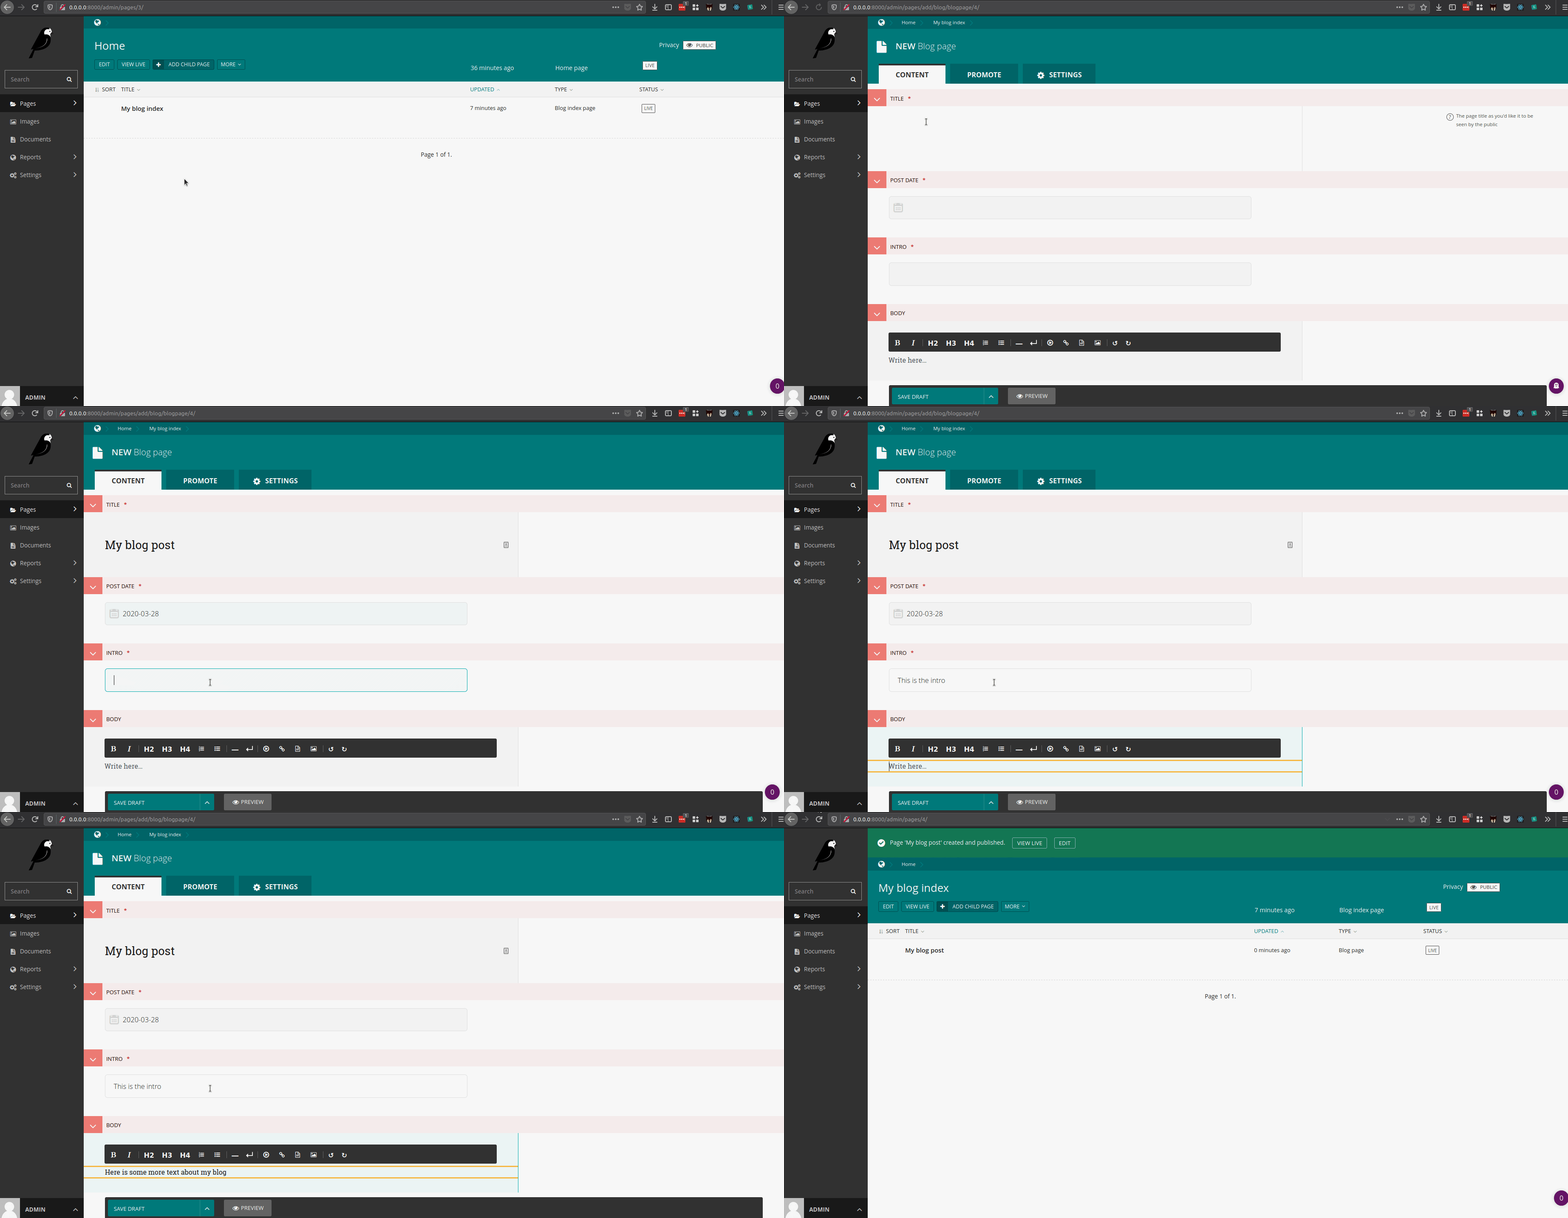
4{% block content %}5 <h1>{{ page.title }}</h1>6 <p class="meta">{{ page.date }}</p>7 <div class="intro">{{ page.intro }}</div>8 {{ page.body|richtext }}9 <p><a href="{% pageurl page.get_parent %}">Return to blog</a></p>10{% endblock %}Now we can add a blog page as a child of our blog index:
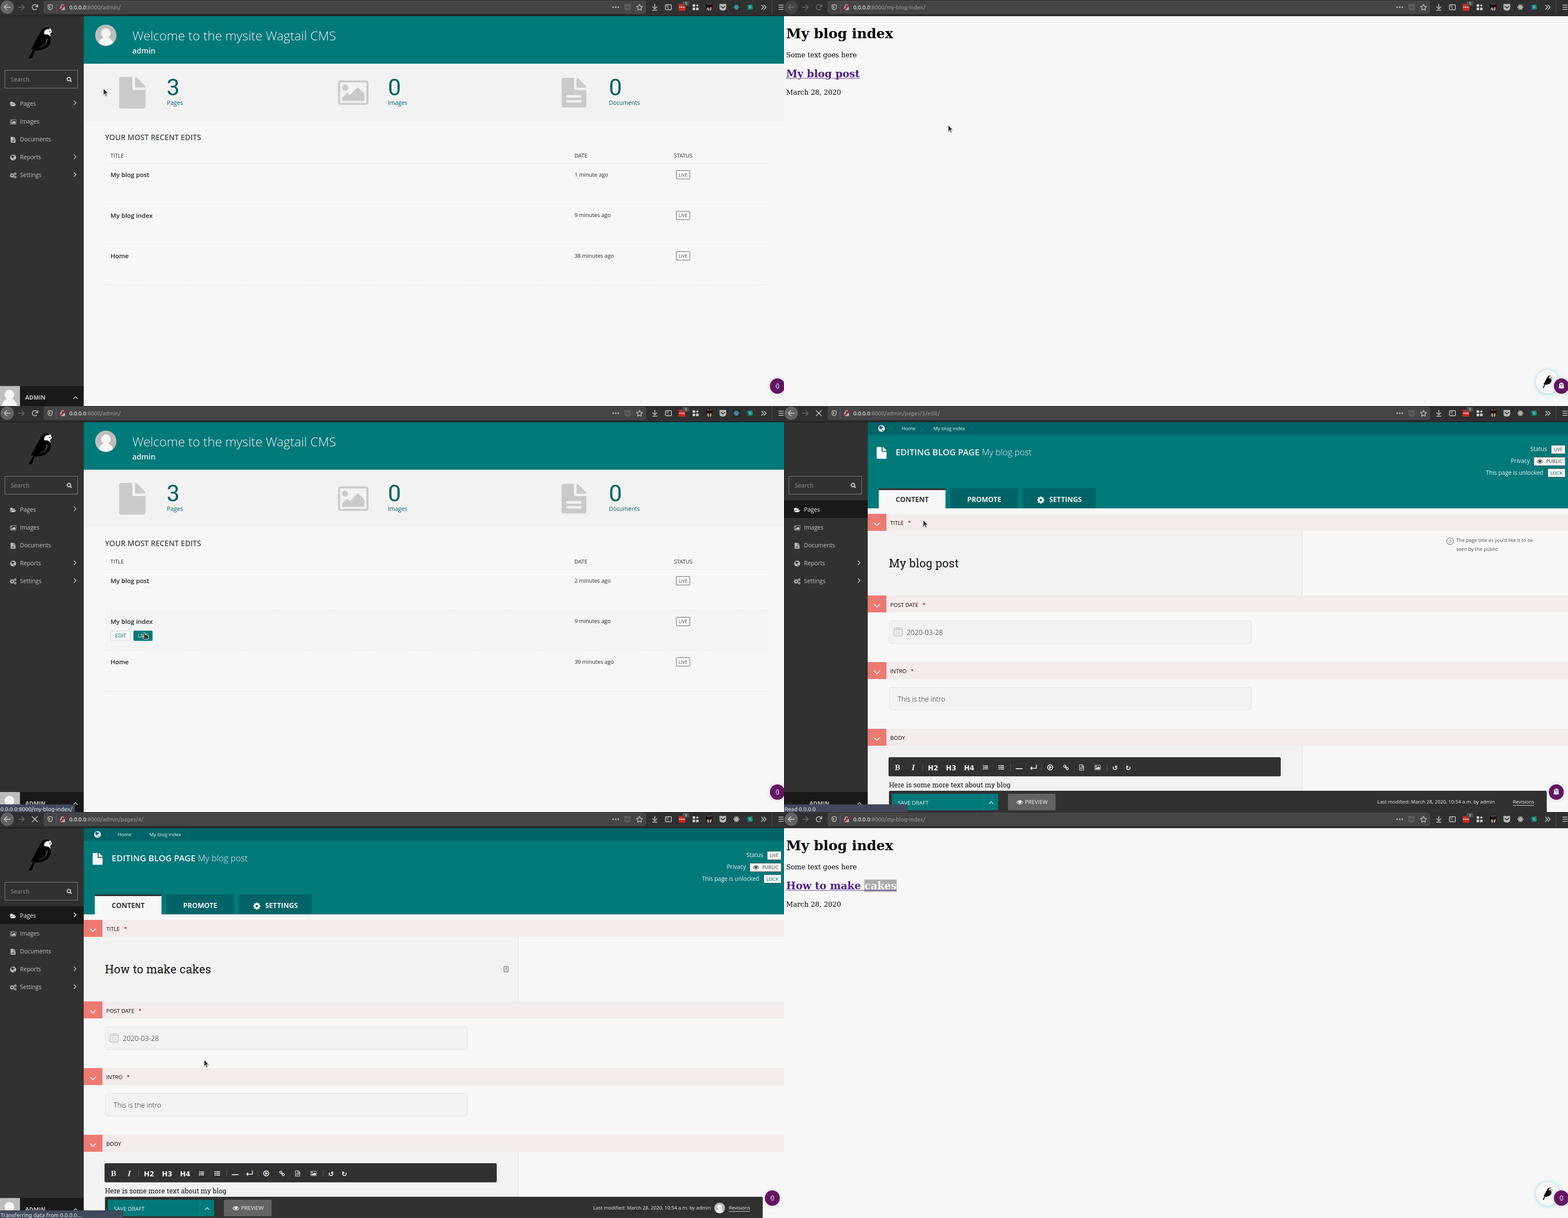
Let's see what we have by going to our admin and checking the front end of the pages we created:
Improve the blog listing
The template that we added for the blog index shows each of the 'child' blog post pages already, but we can improve on this.
Posts should be in reverse chronological order, and we should only list published content. We will do this by adding a new variable to the 'context' that is passed to the template, and passing in a filtered and sorted list of blog posts, instead of just asking wagtail for all the child pages of that blog index.
Edit models.py, adding this get_context method to the BlogIndexPage class:
1class BlogIndexPage(Page):2 intro = RichTextField(blank=True)3
4 content_panels = Page.content_panels + [5 FieldPanel('intro', classname="full")6 ]7
8 def get_context(self, request):9 # Update context to include only published posts,10 # in reverse chronological order11 context = super(BlogIndexPage, self).get_context(request)12 live_blogpages = self.get_children().live()13 context['blogpages'] = live_blogpages.order_by('-first_published_at')14 return contextNow we can update the blog index template to loop over blogpages instead of page.get_children.
1{% extends "base.html" %}2{% load wagtailcore_tags %}3{% block content %}4 <h1>{{ page.title }}</h1>5 <div class="intro">{{ page.intro|richtext }}</div>6 {% for post in blogpages %}7 <h2>8 <a href="{% pageurl post %}">9 {{ post.title }}10 </a>11 </h2>12 {{ post.specific.date }}13 {% endfor %}14{% endblock %}Add an image to your blog post model
Check out the video based on this section here.
1# in the imports2from wagtail.images.edit_handlers import ImageChooserPanel3
4# in your BlogPage class5image = models.ForeignKey(6 'wagtailimages.Image',7 null=True,8 blank=True,9 on_delete=models.SET_NULL10)11
12# in your content_panels for BlogPage13ImageChooserPanel('image'),Again, because we added a field to hold data... run python manage.py makemigrations and python manage.py migrate
Update the blog post template to output images
1{% extends "base.html" %}2{% load wagtailcore_tags wagtailimages_tags %}3{% block content %}4 <h1>{{ page.title }}</h1>5 <p class="meta">{{ page.date }}</p>6 {% image page.image fill-320x320 %}7 <div class="intro">{{ page.intro }}</div>8 {{ page.body|richtext }}9 <p><a href="{% pageurl page.get_parent %}">Return to blog</a></p>10{% endblock %}fill is just one of Wagtail's image resizing methods. Details of the others are listed in the docs. Try them out!
Basic styling
Although the basic content is being shown, it doesn't look great.
To get some styling in place that will make this blog a bit more presentable, we can add some CSS. To get us started with the minimum of effort, are going to use an existing CSS framework called tachyons, rather than writing all the CSS ourselves. Add the following to mysite/templates/base.html, before {# Global stylesheets #}:
<link rel="stylesheet" href="//cdn.rawgit.com/necolas/normalize.css/master/normalize.css"><!-- Tachyons CSS minified --><link rel="stylesheet" href="https://unpkg.com/tachyons@4.10.0/css/tachyons.min.css"/>Then wrap the {% block content %}{% endblock %} block in a container div and add the tachyons classes to style the widths of the container:
<div class="container ph3 ph5-ns"> {% block content %}{% endblock %}</div>Add some css styling to your custom css file at mysite/static/css/mysite.css
I'm just going to make the body colour grey.
body { background: #ccc;}Committing our code to git
Check out the video based on this section here.
Create a .gitignore file in the project root:
touch .gitignoreAdd the following to the .gitignore file, this will ensure we aren't tracking certain files in git. For example, python cache files, databases and our virtual environment folder.
*.swp*.pyc.DS_Store/.coverage/dist//build//MANIFEST/wagtail.egg-info//docs/_build//.tox//node_modules/npm-debug.log**.idea//*.egg//.cache//.pytest_cache/db.sqlite3/media//mysite/media//static/### JetBrains.idea/*.iml*.ipr*.iwscoverage/client/node_modules### vscode.vscode
# Environments.env.venvenv/venv/ENV/env.bak/venv.bak/This will stop us committing files to git that we don't really need.
Set up the project first in github
Head to github.com and create a repo for your code. I've called mine 'codersofcolor'
After creating your repo you will see some information:
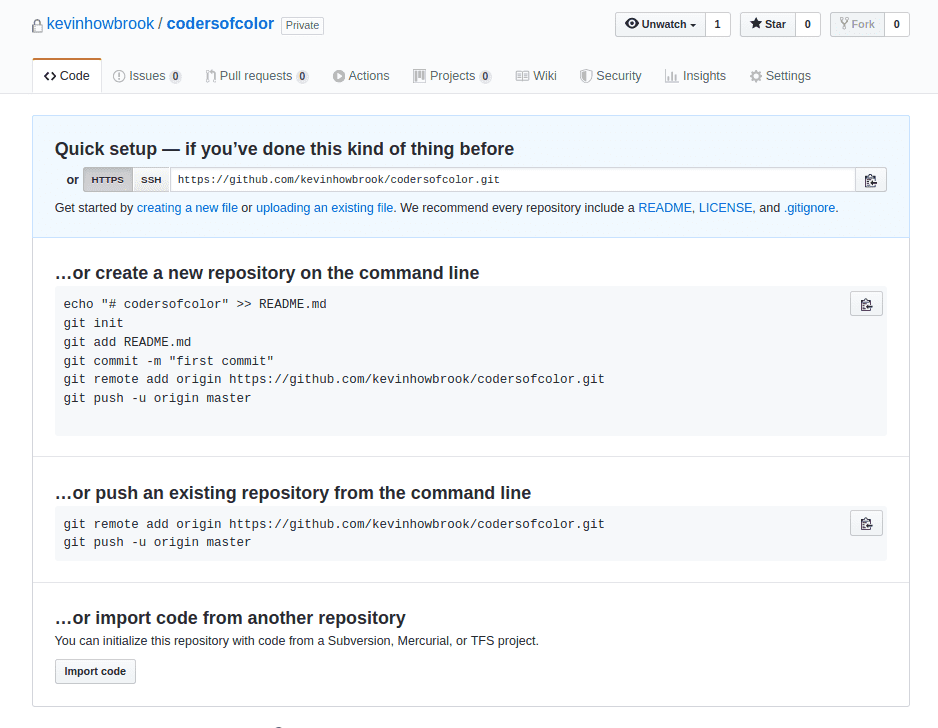
We'll use this to add to our local repo so we can push code to github.
Now in the project root, we need to initialize the git repository, add our first initial commit, and push the code to github.
git initgit add . # the dot means all uncommitted filesgit commit -m "Initial commit"git remote add origin https://github.com/kevinhowbrook/codersofcolor.git # replace your origin heregit push -u origin masterIf all went well... when you go back to the github page and refresh, you should see all your code.
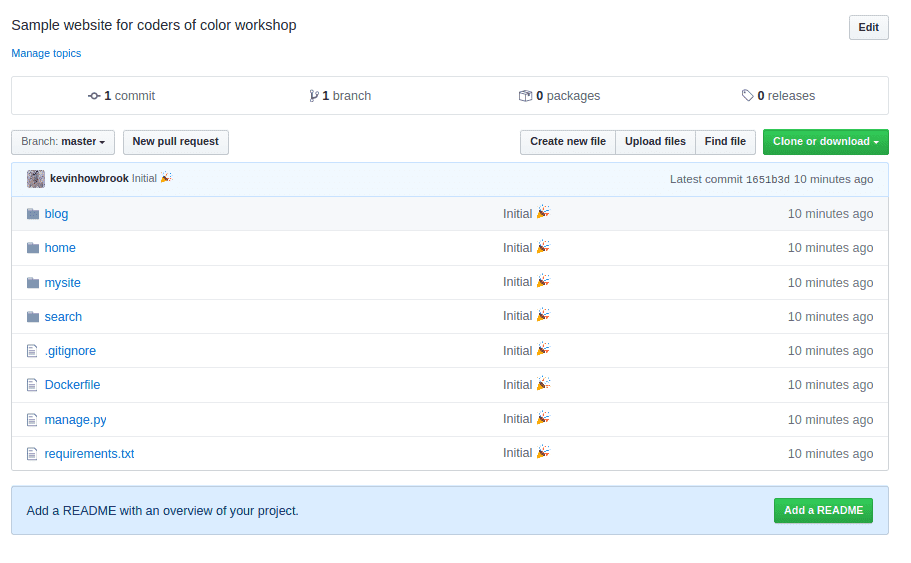
Final task
Read through https://www.makeareadme.com/ and locally add/edit your README.md file in the project root and push it up to github. Take some time to consider what a good README should cover... you'll thank yourself later.
Edit this page on GitHub