Introduction to Wagtail | Coders of Colour
Session 3 - Production and Deployment
Dealing with errors
Before we dive in and start creating the production environment, it's important to understand that we will at some point start seeing errors. If you don't see any errors at all, you're probably doing something wrong!
Locally we can see the stack trace of our app in the terminal where we have started the server with python manage.py runserver, we'll see any errors there. For production, we can set up services like sentry to alert us to bugs and errors when they occur.
On the production site, we can view the live logs with a few commands using the heroku cli, E.g:
heroku logs --tail -a myapp500 errors
Viewing and reading logs is one of the most useful ways of working, and where bugs are concerned it's the first thing to look at. However there are some errors that can occur very early in the stack trace, like 500 errors. When a 500 (internal server error) occurs, it's important to look through the heroku or local logs rather than a service like sentry. Services that notify us of bugs somewhat depend on the app being functional to a point; a 500 error would occur before the app had chance to notify sentry.
The main takeaway from this section is to get into the habit of reading logs. If you have an error on production, the following steps are a good guide:
- Can I see this bug in the heroku logs?
- Can I see this bug locally in the terminal when the local server is running?
- If I cannot see it locally, can I recreate it?
These steps will bring you closer to the overall solution by identifying what the error is, and working towards a fix.
Preparing production
Check out the video based on this section here.
There are a few things we need to do to get our site production ready, and also some specifics for deploying it to heroku. First off, make sure you have a heroku account.
Then we'll need to tnstall the Heroku CLI, https://devcenter.heroku.com/articles/heroku-cli We'll use this for creating the heroku site and some settings changes.
Next, we need to install the various requirements that Heroku looks for when hosting a Wagtail/Django application. One of which is a better database driver for our live site, Postgres.
Add the following to your ./requirements.txt file:
psycopg2-binarygunicorndj-database-urldj-staticThen run the following:
pip install -r requirements.txtpip freeze > requirements.txtThe pip freeze command should have updated your requirements.txt file if successful
As our Heroku app will be accessible to the rest of the web, we'll want to use our production settings rather than our local settings. Our local settings have Debug=True set, and utilise Django's built in static file serving mechanism which is not secure.
First of all, we'll add the following settings into our production.py settings file. These new settings firstly allow us to take advantage of Heroku's PostgreSQL plugin. The ALLOWED_HOSTS setting is necessary to allow Heroku to run our app at the auto-generated domain that it will create.
Open up mysite/settings/production.py and change it to look like this:
import osimport dj_database_urlfrom .base import *
env = os.environ.copy()
SECRET_KEY = env['SECRET_KEY']DATABASES['default'] = dj_database_url.config()
# Honor the 'X-Forwarded-Proto' header for request.is_secure()SECURE_PROXY_SSL_HEADER = ('HTTP_X_FORWARDED_PROTO', 'https')
# Allow all host headersALLOWED_HOSTS = ['*']DEBUG = False
try: from .local import *except ImportError: passCreate a heroku.yml. Heroku requires you to create a file called heroku.yml, in which you declare the commands to be run by your application's Dynos. Your heroku.yml should be located in the root directory of your app, the same directory in which your manage.py file is located:
build: docker: web: Dockerfilerelease: image: web command: - django-admin migrate --noinputMake changes to the Dockerfile. Make the following changes to your ./Dockerfile. Remember to replace mysite with your site name.
FROM python:3.8
RUN useradd wagtail && mkdir /app && chown wagtail /app
WORKDIR /appENV PYTHONPATH=/app \ DJANGO_SETTINGS_MODULE=mysite.settings.production \ PORT=8000 \ WEB_CONCURRENCY=3
# Set argument for switching dev/production requirements.ARG BUILD_ENV
# Port exposed by this container. Should default to the port used by your WSGI# server (Gunicorn). This is read by Dokku only. Heroku will ignore this.EXPOSE 8000
COPY ./requirements.txt /app/requirements.txtRUN pip install --upgrade pip# Install any needed packages specified in requirements.txtRUN pip install -r /app/requirements.txtRUN pip install gunicorn
# Copy the current directory contents into the container at /code/COPY . /app/# Set the working directory to /code/WORKDIR /app/
# Collect static. This command will move static files from application# directories and "static_compiled" folder to the main static directory that# will be served by the WSGI server.RUN SECRET_KEY=none django-admin collectstatic --noinput --clear
# Don't use the root user as it's an anti-pattern and Heroku does not run# containers as root either.# https://devcenter.heroku.com/articles/container-registry-and-runtime#dockerfile-commands-and-runtimeUSER wagtail
# Run the WSGI server. It reads GUNICORN_CMD_ARGS, PORT and WEB_CONCURRENCY# environment variable hence we don't specify a lot options below.CMD gunicorn mysite.wsgi:applicationCreating the Heroku app
We will use the heroku cli to create our heroku app. We will pull our code from github into the heroku app. You may be asked to login when first using the heroku cli, it's the same acount details as your web account you set up.
heroku create codersofcolour --stack=container --region=eu # Replace codersofcolour with your app nameNow we can push our code to heroku. If you ran heroku create from your project root, you should find you have a new git remote added (heroku), if not you'll have to add it manually.
git push heroku HEAD:masterAfter running this you should see a lot of noise in your terminal whilst heroku does it's thing.
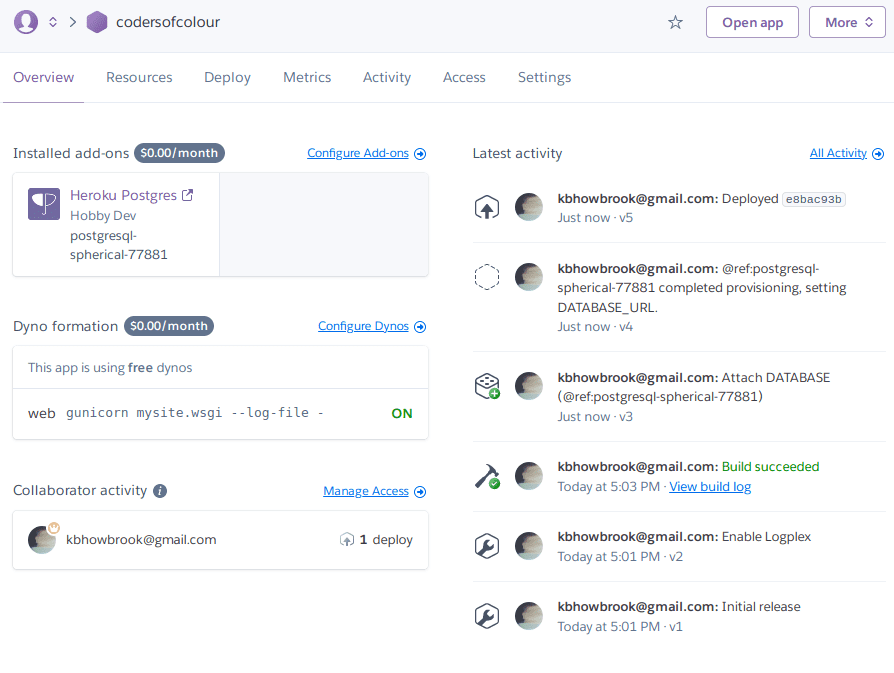
After this is done, heroku should have built your site. In the project on the heoku UI you should see something like this:

We also need to add a database for our website and create scheduled backups
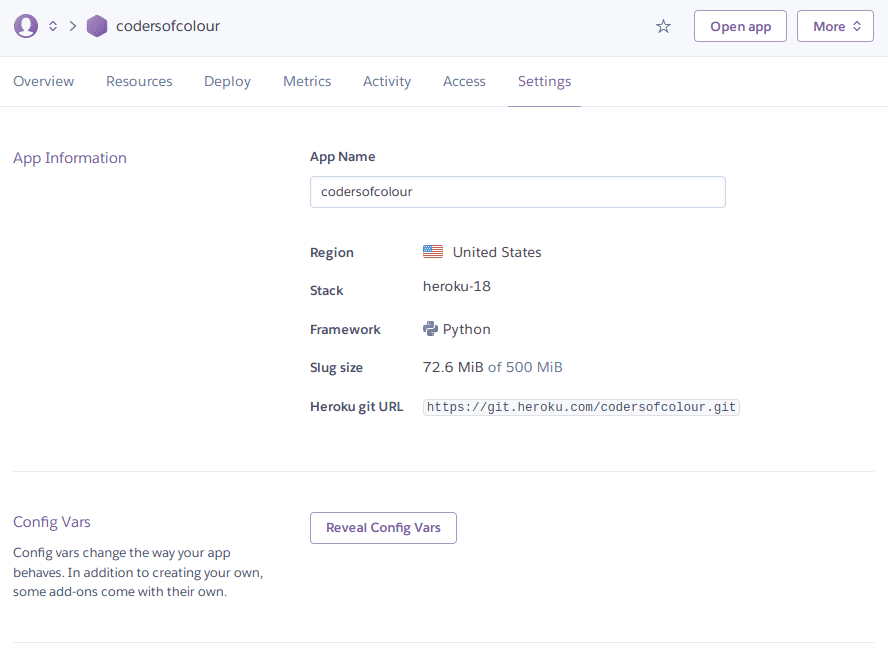
heroku addons:create heroku-postgresql:hobby-dev -a [application-name]heroku pg:backups:schedule DATABASE_URL --at '02:00 Europe/London' -a [application-name]Note that we added a database, you can see heroku added the environment variable for the database under the settings tab by clicking 'reveal config vars'.

Now we need to generate a SECRET_KEY and add our ALLOWED_HOSTS for our production site, we can do this from our local machine using the heroku CLI.
Generate a secret key for the application using:
python manage.py shell -c "from django.utils.crypto import get_random_string; print(get_random_string(50))"Then copy the key and place it in a command like this:
heroku config:set SECRET_KEY=[key-you-just-generated] ALLOWED_HOSTS=[application-name].herokuapp.com PRIMARY_HOST=[application-name].herokuapp.com -a [application-name]Next, setup the database. Back In your local terminal, from your project root run the following.
heroku run python manage.py migrateheroku run python manage.py createsuperuserThe above is running similar shell commands we did locally, but using the heroku CLI we can run them on our heroku container.
Your site should now be live on heroku, check by opening the app again from with heroku.
You might have noticed that none of your css styling is applied though... we need to make a few more adjustments for this using a package called Whitenoise
Whitenoise is a Python library that allows Django to serve its own static files without relying on a CDN like Amazon S3. First of all, let's install the package and add it to our requirements.txt file. Locally switch back to your terminal and project root.
pip install whitenoisepip freeze > requirements.txtNow you need to add Whitenoise to your MIDDLEWARE. Open settings/base.py and add whitenoise. Note This MUST go after ...SecurityMiddleware
MIDDLEWARE = [ ... 'django.middleware.security.SecurityMiddleware', 'whitenoise.middleware.WhiteNoiseMiddleware', ...]Now let's change our static file storage type, and some compression settings. Open settings/production.py and add this:
1STATICFILES_STORAGE = 'whitenoise.storage.CompressedManifestStaticFilesStorage'2COMPRESS_OFFLINE = True3COMPRESS_CSS_FILTERS = [4 'compressor.filters.css_default.CssAbsoluteFilter',5 'compressor.filters.cssmin.CSSMinFilter',6]7COMPRESS_CSS_HASHING_METHOD = 'content'To sync updates, we use git. So lets add our changes to a new git commit.
git add .git commit -m "Added Whitenoise"Setting up CI deployment with github actions
Check out the video based on this section here.
What is CI?
CI stands for continuous integration. You'll often see it paired with 'CD', which mean continuous delivery. Typically, CI means the introduction of an automated process to test, build, or deploy your software. In most cases it does all of these.
In this section we are going to use GitHub Actions to test and deploy our app whenever we make changes to it.
GitHub Actions makes it easy to automate all your software workflows, now with world-class CI/CD. Build, test, and deploy your code right from GitHub. Make code reviews, branch management, and issue triaging work the way you want.
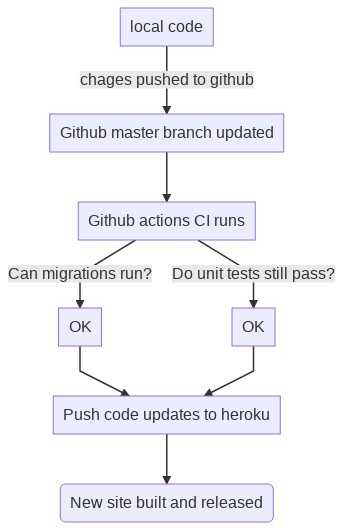
The workflow we will be building will look like this:

Benefits of this process
From the workflow above, it's good to understand why we would go the trouble of setting up CI, because we might already be able to autodeploy our code to heroku directly from git hub. The main problem with an 'auto' or 'synced' repository deployment is that we aren't checking the stability of our code and there is potential for bugs to make there way to our live site.
With the CI in place, if bugs are found, the CI will fail and the site will not be deployed. We will be using Django's built in management commands to run tests and check the code is OK to deploy.
Setting up the action.
In your codebase, add the new folders at the root level:
./.github./.github/workflowsSo you should have a folder called .github and inside that, another folder called workflows.
Add the action yaml file
Create a file in the workflows folder called deploy.yaml. And add the following:
name: Deploy to heroku
on: push: branches: [ main ]
jobs: build: runs-on: ubuntu-latest steps: - uses: actions/checkout@v2 - name: Set up Python 3.7 uses: actions/setup-python@v1 with: python-version: 3.7 - name: Install dependencies run: | python -m pip install --upgrade pip pip install -r requirements.txt - name: Django tests run: | python manage.py collectstatic --clear --noinput python manage.py makemigrations --check --noinput python manage.py check python3 manage.py test - uses: akhileshns/heroku-deploy@v3.12.12 with: heroku_api_key: ${{secrets.HEROKU_API_KEY}} heroku_app_name: ${{secrets.HEROKU_APP_PRODUCTION}} heroku_email: ${{secrets.HEROKU_EMAIL}} - name: Success run: echo Successfully Deployed!!Adding github environment variables
You'll notice in the above config we have the following lines:
- heroku_api_key: ${{secrets.HEROKU_API_KEY}}
- heroku_app_name: ${{secrets.HEROKU_APP_PRODUCTION}}
- heroku_email: ${{secrets.HEROKU_EMAIL}}
We don't want these values to be sectred, so we can add them to github in a way that hides them. First create an api key at https://dashboard.heroku.com/account, scroll down to the API Key section and generate a key.
Next head to your github repository and got to > Settings > Secrets (left hand menu) and add in your secret values.
- HEROKU_API_KEY: the api key from heroku you generated
- HEROKU_APP_PRODUCTION: the name of your production app
- HEROKU_EMAIL: your heroku account email
Changes to the heroku app
Check the heroku app stack at the moment, you should see a star next to your stack.
$ heroku stack -a yourapp=== ⬢ codersofcolour Available Stacks container heroku-16 heroku-18* heroku-20It should be container based from when we created is, if it's not... we can set it like so:
heroku stack:set container -a yourappFrom now on when we merge or push code to the github main branch the site will automatically deploy via the github action.
Finish by pushing your code to github.
git push origin mainYou should now see your styling coming through. E.G https://codersofcolour.herokuapp.com/
Edit this page on GitHub